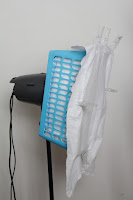
1) Gather the bits
We have a cheap storage basket, some reflective foil, the sort you shove behind radiators to safe energy, a white sheet, some clothes pegs, duct tape, and electrical insulation tape. The tools I used were scissors, a Dremmel, and a sharpie.
2)

3)
Use the basket to mark out
 the fold on the back of the foily stuff. Cut off the corners
4)
Check the foil fits properlyish. You can score, or fold this stuff which helps.
5)
Use the Duct tape to join the edges of the foil, then shove it in the basket.
6)
Tape the excess foil over the side of the basket to hold it in place
7)
Carefully cut out a hole for the light to poke through. Leave some excess to fold over and tape to the back. This helps hold the whole contraction to the light without having to use tape on that too.
8)
This is what it looks like in situ.
9)
I added some of the cotton sheet to soften the light a little


No comments:
Post a Comment